[Home-K8S] #22 FluxCD 계층과 분리 / 다중 클러스터 리소스 공유와 설정 분리
FluxCD - yaml 앞서 fluxcd 를 이용해서 helm chart 를 구성했습니다. 그 외에 일반적인 yaml

이전 포스팅에서 댓글 시스템인 Disqus를 구성해 보았습니다.
계속해서 Disqus를 사용해도 별로 상관은 없지만, 애초에 제 블로그에 로그인을 해야 댓글을 남길 수 있는 시스템을 없애고자 해서 댓글 시스템을 따로 구현하고 있는데 Disqus에 또 로그인을 해야하는 것은 좋은 생각은 아닌 것 같습니다.
그래서 많은 과정없이 빠르게 댓글을 남길 수 있는 오픈소스를 찾아보았고 Isso가 적당하다고 생각하여 변경하게 되었습니다.
근데 Isso로 하고 나서 찾아보니 giscus 라고 github를 이용한 서비스가 있더라구요. 개발 블로그니까 이것도 좋아보여서 옮길까 합니다.
k8s가 구성된 개인 PC에 모든 것을 구성하다 보니 container로 된 서비스만 찾게 되는 것 같습니다.
(이전엔 뭐든 Python으로 만들어 봤을 텐데 의욕이 없나...)
isso 도 opensource 지만 공식 image가 있습니다. (github에)
isso의 경우 latest 대신에 버전을 붙여서 사용하는 것을 권장하더라구요.
pvc, configmap, deployment, service, ingress를 만들어 줍시다.
apiVersion: v1
kind: ConfigMap
metadata:
  name: isso-config
  namespace: ghost
data:
  isso.cfg: |
    [general]
    dbpath = /db/comments.db
    host = https://blog.dogring.kr/                 # 댓글 시스템을 사용할 도메인

    [server]
    listen = http://0.0.0.0:8080
    public-endpoint = https://comment.domain.com    # 댓글 시스템의 도메인

    [moderation]
    enabled = false

    [guard]
    require-author = true                           # 이름 필수
    require-email = false                           # 이메일 필요 없음
---
apiVersion: apps/v1
kind: Deployment
metadata:
  name: isso
  namespace: ghost
spec:
  replicas: 1
  selector:
    matchLabels:
      app: isso
  template:
    metadata:
      labels:
        app: isso
    spec:
      containers:
      - name: isso
        image: ghcr.io/isso-comments/isso:0.13.0
        ports:
        - containerPort: 8080
        volumeMounts:
        - name: isso-config
          mountPath: /config/isso.cfg
          subPath: isso.cfg
        - name: isso-db
          mountPath: /db
      volumes:
      - name: isso-config
        configMap:
          name: isso-config
      - name: isso-db
        persistentVolumeClaim:
claimName: isso-pvc기존에 Disqus 나 다른 댓글 서비스가 있던 위치에 아래의 값을 넣으면 됩니다.
data-isso-vote = "false" - 댓글의 투표기능(좋아요/싫어요) 를 비활성화 합니다.
<section class="post-full-comments">
    <script
        data-isso="https://comment.domain.com/"
        src="https://comment.domain.com/js/embed.min.js"
        data-isso-lang="kr"
        data-isso-vote="false">
    </script>
    <section id="isso-thread"></section>
</section>
기존에 하듯이 {{Post}} 안에만 넣으면 댓글 시스템이 창 크기가 꽉 맞게 설정되어 보기가 안 좋더라구요. 그래서 저는 content 안에 넣어 주었습니다. 그러니까 크기가 적당하더라구요.
<div class="content">
    {{content}}
    <section class="post-full-comments">

    ...

    </section>
</div>
이렇게 하고 Ghost 를 재시작하면 기본적인 Isso 댓글 사용방법은 완료입니다.
제가 이메일이나 다른 정보를 넣는 것을 안좋아한다고 했죠. 그런데 계속해서 지저분하게 입력칸이 남아 있습니다. 이것을 지워줘야 하는데요.
Ghost CMS에는 setting에 Code injection이 있습니다. CSS와 JS 등 웹 페이지에 코드를 넣는 방법이죠.
여기서 Site header에 isso의 CSS를 꺼주는 코드를 넣어줍니다.
#isso-thread #isso-postbox-email,
#isso-thread label[for="isso-postbox-email"],
#isso-thread #isso-postbox-website,
#isso-thread label[for="isso-postbox-website"] {
display: none !important;
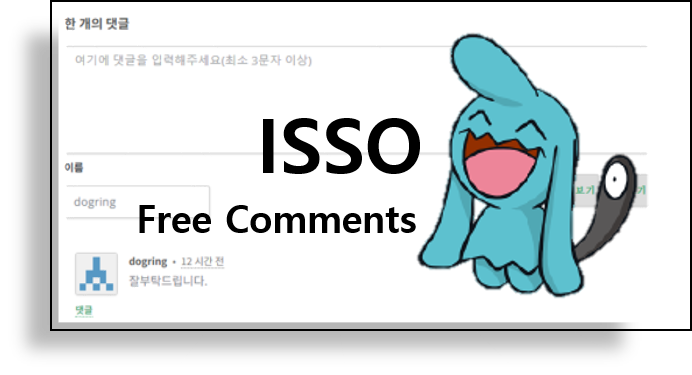
}그러면 아래와 같이 이름만으로 댓글을 달 수 있게 됩니다.
근데 뭔가 좀 보안적으로도 그렇고 약간 맘에 걸리는 게 있어요. 그래서 댓글 입력 IP를 이용해서 사용자를 관리하려는 생각을 하려고 합니다.
그러려면 isso를 고쳐봐야 겠어요.
Comments